Tips and tricks archive

Resolving CSS imports with CssCombine

Friday, January 1st, 2010

When designing websites, I usually write multiple stylesheets for multiple parts of the website. For example, for gljakal.com I had 5 different stylesheets:

  1. header.css for the header/logo area,
  2. content.css for the content area,
  3. sidebar.css for the sidebar,
  4. footer.css for the footer
  5. and finally theme.css, that includes the style for all the above:

    @import url("header.css"); @import url("sidebars.css"); @import url("content.css"); @import url("footer.css");

On more complex projects, I usually have even more stylesheets. One thing I am usually constant about however is having a generic theme.css or style.css that includes the other files. This is convenient because in my HTML pages I just have to link only one stylesheet file.

This technique works really well when testing the website on my local machine, however in production it has the downside of generating multiple requests on the client.

To address this problem, I wrote a small command-line program that would follow @import instructions and merge the imported files in the main one. It’s called CssCombine.

The code (in c#) is merely 48 lines long:

using System; using System.Collections.Generic; using System.Text; using System.Text.RegularExpressions; namespace CssCombine { class Program { static void Combine(string parFileName, StringBuilder parOutput) { string[] lines = System.IO.File.ReadAllLines(parFileName); foreach (string s in lines) { if (s.Trim() != "") { Regex rgx = new Regex(@"@import\s+url\s*\((.*)\);", RegexOptions.IgnoreCase | RegexOptions.CultureInvariant); string[] sx = rgx.Split(s); if (sx.Length > 1) { string sFile = sx[1].Replace("\"", "").Replace("'", ""); sFile = System.IO.Path.Combine(System.IO.Path.GetDirectoryName(parFileName), sFile); Combine(sFile, parOutput); } else { parOutput.AppendLine(s.Trim()); } } } } static void Main(string[] args) { if (args.Length != 2) { Console.WriteLine("Usage: CssCombine [input.css] [output.css]"); } else { string input = args[0]; string output = args[1]; StringBuilder sbOutput = new StringBuilder(); Combine(input, sbOutput); System.IO.File.WriteAllText(output, sbOutput.ToString()); } } } }

Or you can download the compiled program here.

Another optimization would be to minify the resulting file. I use Yahoo’s YUI Compressor for that.

Getting rid of the Naming container in ASP.Net 2.0 – update

Tuesday, October 6th, 2009

In my previous article, Getting rid of the Naming Container in asp.net 2.0, I explained a method to override the extended naming functionality provided by ASP.net in order to create client-side controls with better IDs.

I was however informed in the comments that by overriding the NamingContainer property the control loses the ability to read its value from the PostBack data.

Since the controls I developed were not meant to to be used in a postback scenario, this wasn’t a big problem for me.

Fast-forward a couple of years and here I am, wondering why post back does not work in one of my projects 😉

Anyway, I looked at the link provided by Alex, where Rick Strahl talks about overriding the ClientId and the UniqueId properties instead of NamingContainer.

In a standard web control, the two properties ClientID and UniqueID are mapped, respectively, to the id and name properties of the HTML control generated.

Since most (all? ) JS frameworks use the id property to access the varius HTML elements and the PostBack mechanism uses the name property, I think the “best of both worlds” solution is to only override the ClientId:

public class NiceTextBox : System.Web.UI.WebControls.TextBox { public bool UseNamingContainer { get; set; }


public override string ClientID { get { if (this.UseNamingContainer) return base.ClientID; else return this.ID; } } }

Now our NiceTextBox works even during post-back scenarios 🙂

How to start any program with Windows

Friday, June 22nd, 2007

A lot of people asked me what’s the best way to launch Clock! as soon as they log into their computers.
In Windows, there is a very simple way to start any program right after you type your username and your password in the login screen. It’s called the “Startup Menu”.

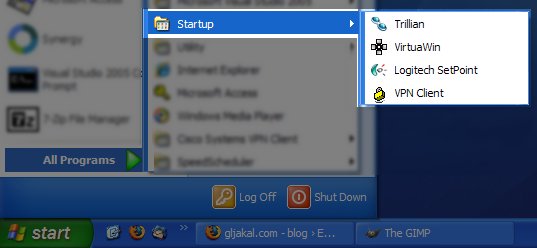
The startup menu

The startup menu is simply a folder located under “All programs” in your Start menu. Every program located in this folder is automatically launched when you log into windows.
How do you add an item to the startup menu? The first thing to do is right-click it and choose Open. Now, probably you have a link to the program you would like to launch on your desktop. Just drag and drop your desktop icon inside the startup menu folder and there you have it: your favorite program will now start with windows!

gljakal’s MP3Streamer

Tuesday, April 17th, 2007

gljakal's MP3Streamer screenshot
Have you ever visited the website of an independent musician? Often you will find that they are kind enough to let you download some of their tracks in mp3 format. But then you have to download the mp3 somewhere on your computer, wait for the transfer to complete and (if you still remember where you actually saved it!) open the mp3 file with your audio player of choice. Isn’t there a quicker way to listen to a song or a podcast? Sure there is!
Gljakal’s MP3Streamer does just that, in the simplest way possible: just copy the address of the song you want to listen in the “mp3 file address” field and hit “Stream” to start listening: no downloads, no waiting, it’s all set!
If you are a musician or a podcaster, you can also use the HTML code provided to embed the mp3 player directly into your site!
Also, if you are really really lazy like me, you can get a bookmarklet that will convert all the links to mp3 files in the page you are currently visiting in mp3 players :).
Have fun!

Quick searches in Firefox

Friday, April 28th, 2006

One thing I really loved about Opera (the browser), is that you can launch a google search simply by typing the letter g followed by your search phrase in the address bar: so, for example, if I’m searching for free task management software, I can just type “g free task management software” in the address bar and I’ll be taken to the google results page for my search phrase. This is an incredibly nice feature to have, because it greatly speeds up any web search.
Firefox users will surely love to learn that their favorite browser has an even better approach to the same feature. Not only Firefox comes with an array of quick searches (for example, “google” searches on google, “wp” searches on wikipedia and so on), but these searches are totally configurable!
For example, let’s try to add a quick search for Google Images, so that when I want to search for an image of a cat I can just type “i cat” in the address bar.
First, we have to go to the google images page.
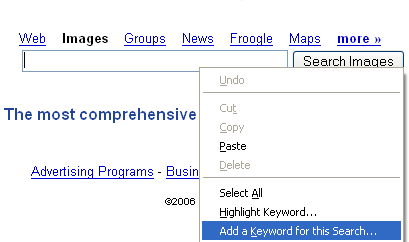
Next, we need to right click inside the text box and choose “Add a keyword for this search”.


Adding a quick search for Google Images in Firefox - step one

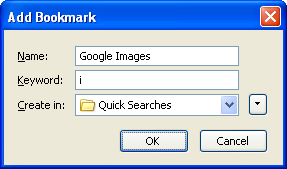
The “Add Bookmark” window pops up. Let’s use “Google Images” as the bookmark’s name and “i” as the bookmark’s keyword.
I usually save my quick searches inside a folder named “Quick Searches”.

Adding a quick search for Google Images in Firefox - step two

Press Ok and you’re done! Now, any time you want to search for an image you just need to type the letter i followed by your search terms in the address bar and you will be taken to the google images results page.

Enchance text readability on your laptop

Tuesday, February 21st, 2006

A lot of people don’t know this, but you can greatly enhance the appearance of the text displayed on your screen by turning on ClearType.
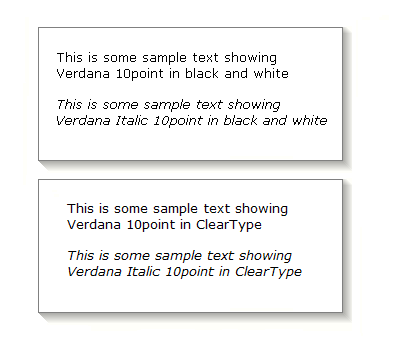
Cleartype is a new feature introduced in Windows XP that uses a technique known as “sub-pixel font rendering” to “round up” the text displayed.
While the “cleartyped” text may be a little too blurry on normal CRT monitors, it becomes more readable and pleasing to the eye on laptop monitors.
Cleartype vs standard
Cleartype is enabled by right-clicking on your desktop, selecting [Properties], then on the [Appearance] tab clicking on [Effects] and finally enabling “use the following method to smooth edges of screen fonts”. You can choose [Standard] or [Cleartype]. The difference between standard and cleartype is that the standard setting smooths only big-sized text, thus making it more suitable to CRT displays.
You can also change your Cleartype settings with ClearTweak, a free software from ioIsland.com.